Shooting and editing are my favorite things to work on in terms of blogging. If I could, I’d spend hours, every single night, just editing photos. There is just something incredibly rewarding, satisfying and… a little bit soothing about the entire process. Also, here’s a little secret: my Instagram and blog images never look all bright and pretty when I upload them to the computer.
One of the best things you can do, as a beginner, is to understand how your camera works. Despite my love for bright photos, most of my images are actually on the dark side when imported to my computer, and that is because in order to get a sharp image, you sometimes, depending on your light source, have to sacrifice other things, such as brightness of your image. This post explains this relationship in detail.
If you’re just getting familiar with Photoshop, YouTube can be your best friend here. There are so many amazing channels out there and so many great tutorials (Phlern is one of my personal favorites), there literally are hundreds of different ways to do things in Photoshop. In this post, I will focus on very simple and quick fixes that you can easily do when saving a bad photo you took for your blog.
When editing images in Photoshop, you want to work in layers- this is probably one of the first and most important things you should learn about working with Photoshop. What are layers? Think of them as sheets of papers stacked on top of each other. Each edit should be created on a new layer- this will create non-destructive editing and it will allow you to make changes to your edits. As you edit your images, you can move, change, adjust or delete your layers (edits). Now, those layers or “stacks of paper” can be transparent, they can also be opaque- it all depends on what you will do with them. Here are some of my most-used techniques/edits for quickly fixing a bad image.
BLOG TIPS: HOW TO FIX A BAD PHOTO
HOW TO FIX: A GRAINY PHOTO
Unless you know your camera well, unless you understand how it works or have some solid photography equipment, there will be times where you have to sacrifice the quality of your image for other aspects like brightness. When working with a limited light source, for instance, you might have to bring up your ISO to compensate for that, which in turn can leave you with some noise in your image. This is also why I highly recommend you shoot in RAW as your camera captures all the image data and gives you a lot more freedom when editing your work. I use Bridge to import and organize my RAW files, which comes free with my Photoshop CC subscription, which is $9.99 a month (you also get Lightroom with this plan).
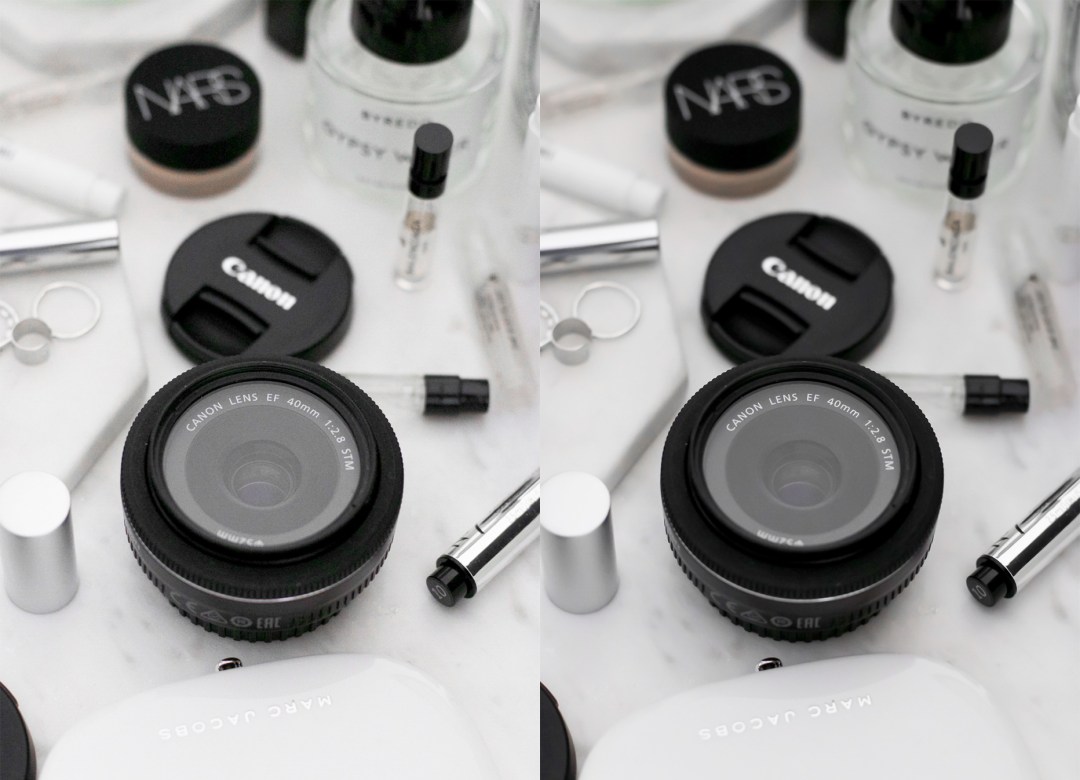
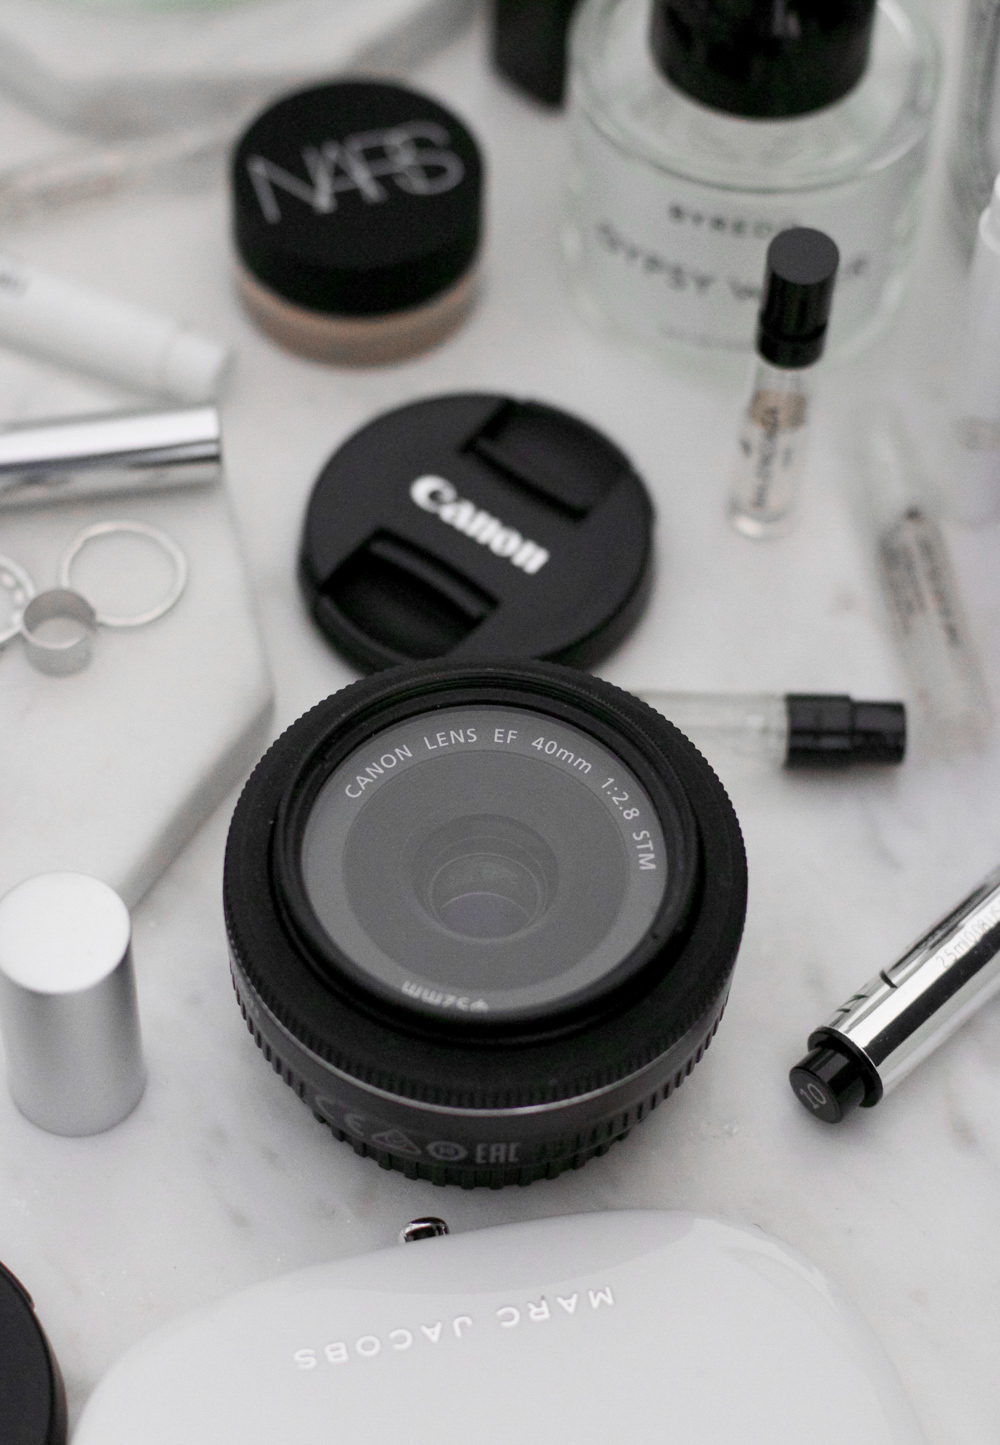
This is an example of a grainy image. You can see that dark bits in this image have a lot of noise to them, which is due to the fact that this was shot at a high ISO.
A very simple fix for a photo that turns out to be a bit too grainy is by going to Filter >> Noise >> Reduce Noise. This will bring up a window where you will be able to soften your image, get rid of any noise and those annoying grainy bits. This tool is a life-saver when shooting in low-light situations.

Working with the noise filter.
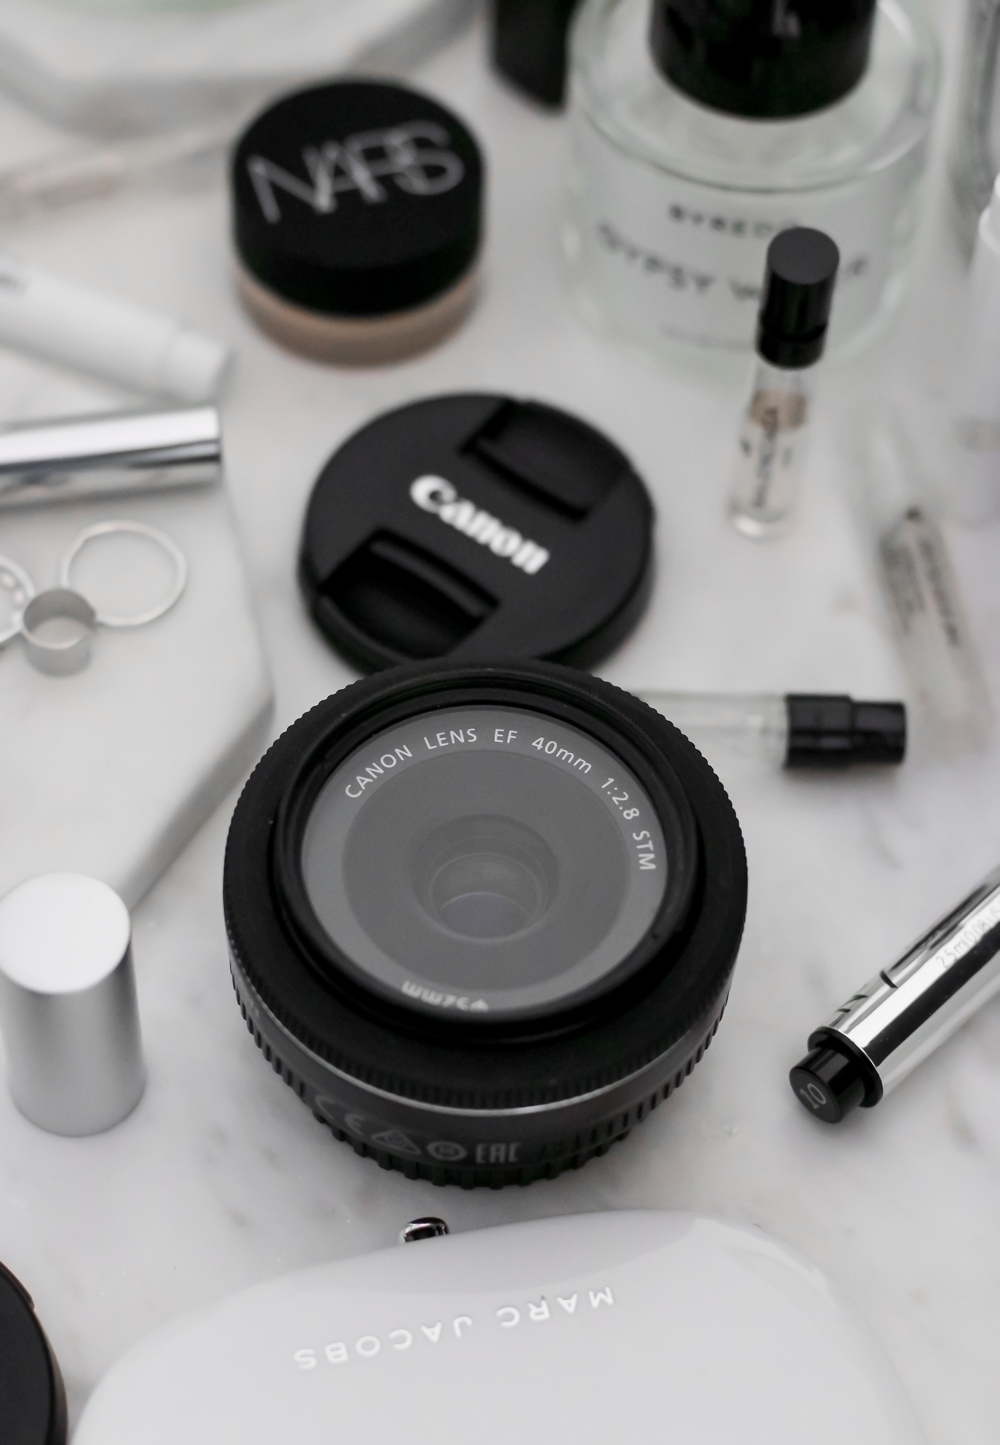
Here is the same image after reducing the noise- you can see that the image looks smoother, much better, without any loss of detail. Another place where you can do this is in Camera Raw- just go to the “Detail” tab, and you can reduce the noise by adjusting the luminance and color smoothness settings.
HOW TO FIX: A DARK PHOTO
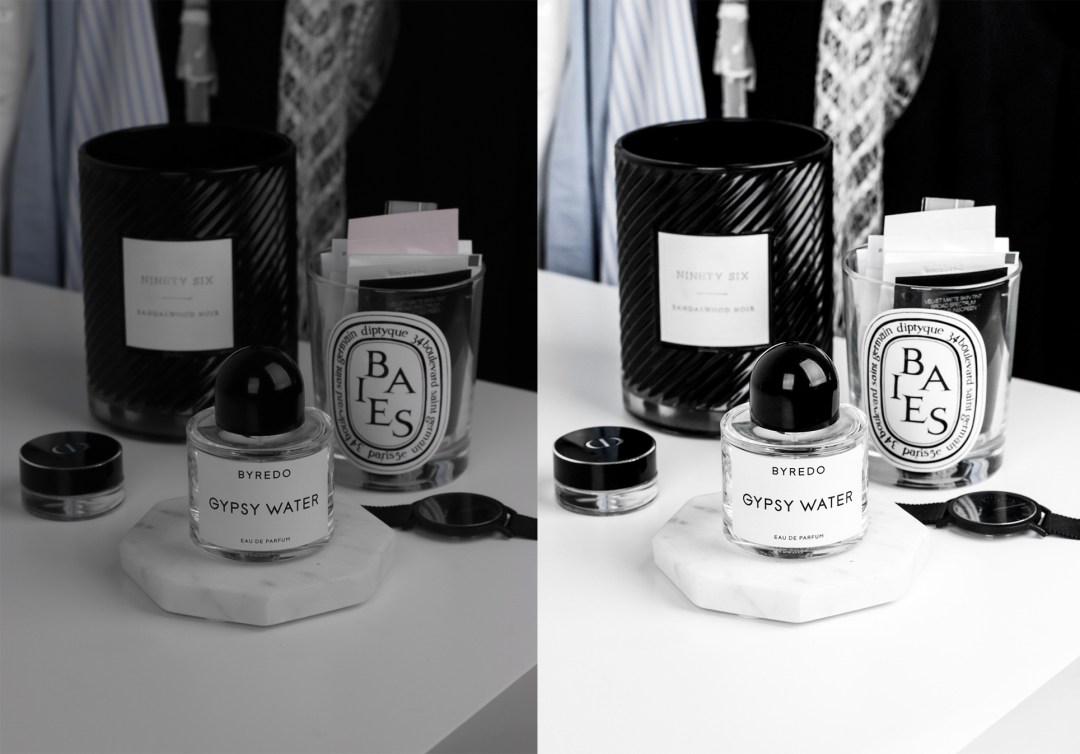
Correcting an underexposed photo is probably one of the easiest things to fix about your image, and there are so many different ways you can do so in Photoshop.
Brightness + Contrast– this is probably the first place you’d think of going when trying to adjust/correct the exposure. This is a very simple and a not very complicated way to do things, sort of like a simple editor in your phone. Just go to Image >> Adjustments >> Brightness/Contrast and adjust both to your liking. Of course, being such a simple tool, it also has its limits- which is why usually I love working with levels, instead.
Levels– here you will be able to make more precise corrections based on a histogram. To open up levels, click Command (Ctr) + L on your keyboard. This will bring up a histogram where you will be able to adjust the tonal range of your image. Move the left slider to adjust your shadows, middle one to adjust your midtones and the right one to control your highlights. To best understand how these work, is to simply play around with the sliders and see how each affects the image. This histogram will, of course, look different for each image you open.

Working with levels.
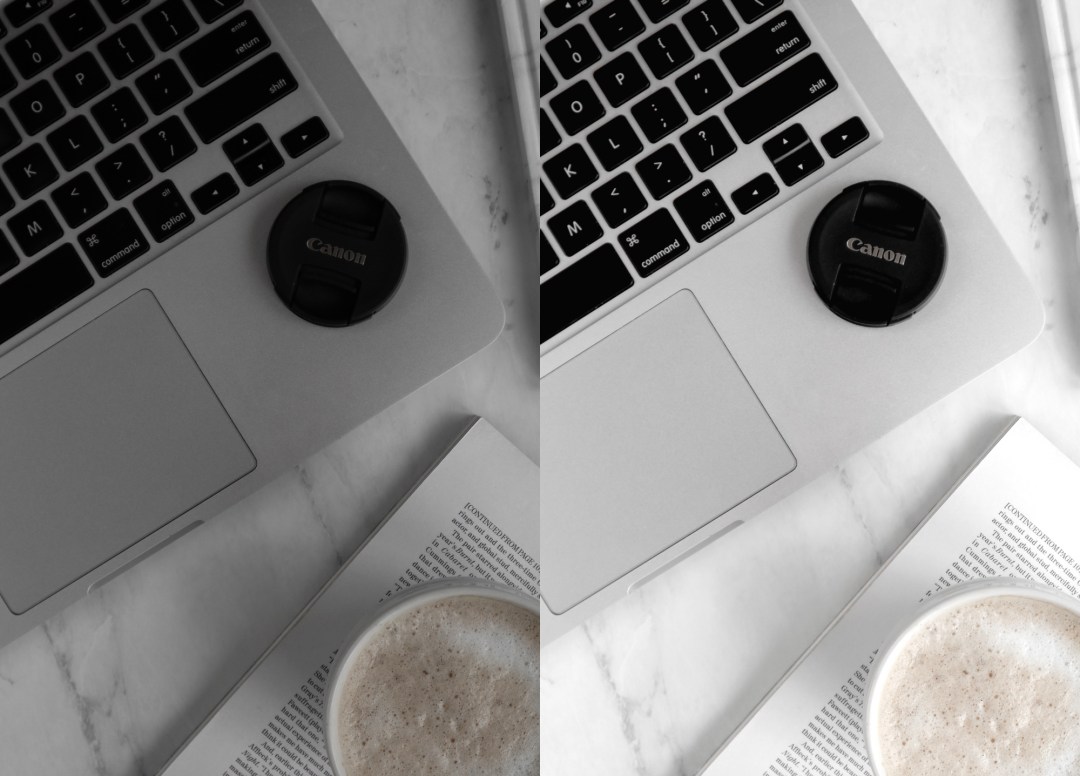
SOOC (straight out of camera) and after adjusting the tones in levels.
Curves- levels and curves use will depend on your preferences and the editing you plan to do on your images. Everything you can do in levels, you can also do in curves. Curves is a more advanced tool which allows you to make more aggressive and involved changes, you could, for instance, adjust tones in just particular areas in your image. It is definitely a tool worth getting familiar with.
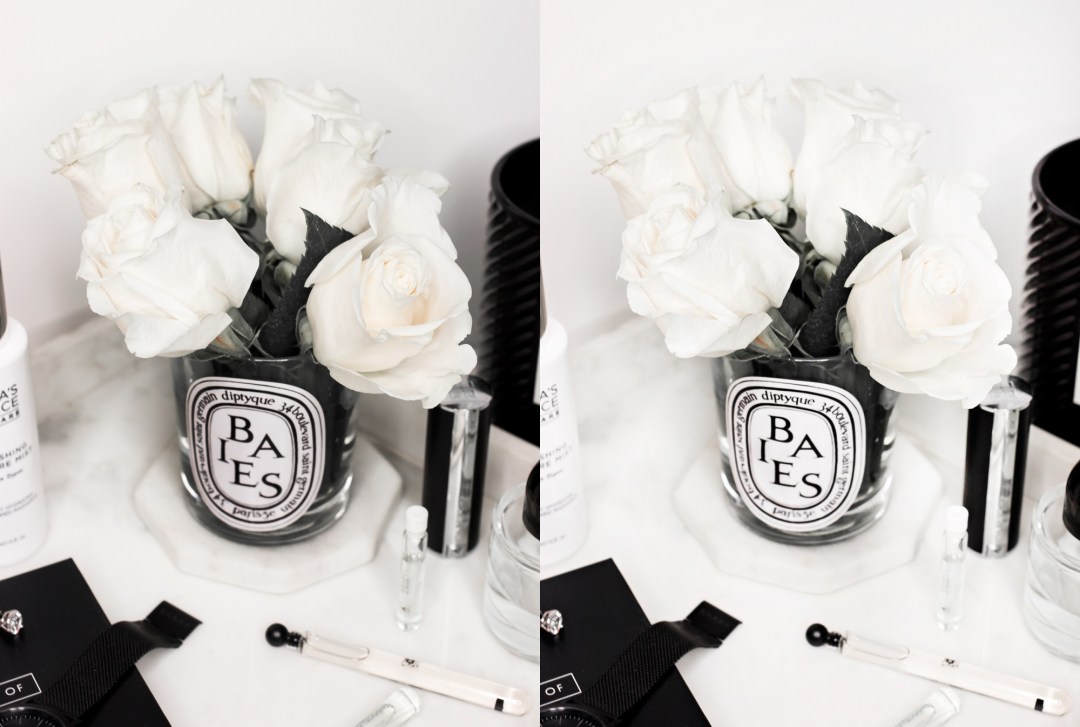
Before and after using the dodge tool
Dodge tool– this is another great Photoshop tool for quick edits, especially when you’re working with photos of beauty products. If you need to quickly brighten up a small/big area such as a logo or a small shadow somewhere, you can just grab the dodge tool and literally paint over the area you want to brighten. You do have to be careful when adjusting your exposure setting, as it’s very easy to overdo it when using the dodge tool and make your image appear very obviously edited.
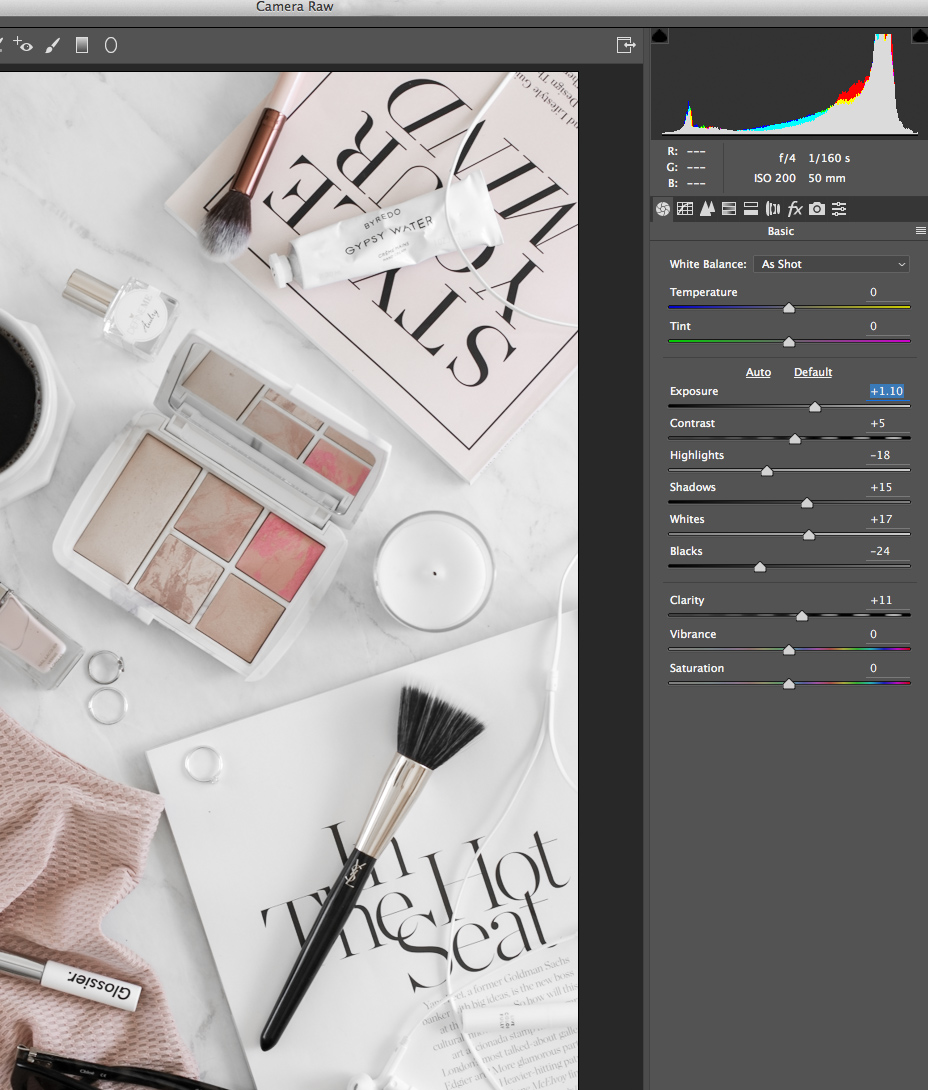
Simple + Quick Editing in Camera Raw
Camera Raw- in case you couldn’t tell, I love using Camera Raw for quick edits. You can easily adjust your whites, highlights, exposure, and clarity of your image, in under a minute, by adjusting same under the Basics tab in Camera Raw. Your RAW files should automatically open in Camera Raw when you open them in Photoshop. You can also go to Filter >> Camera Raw Filter to open it up.
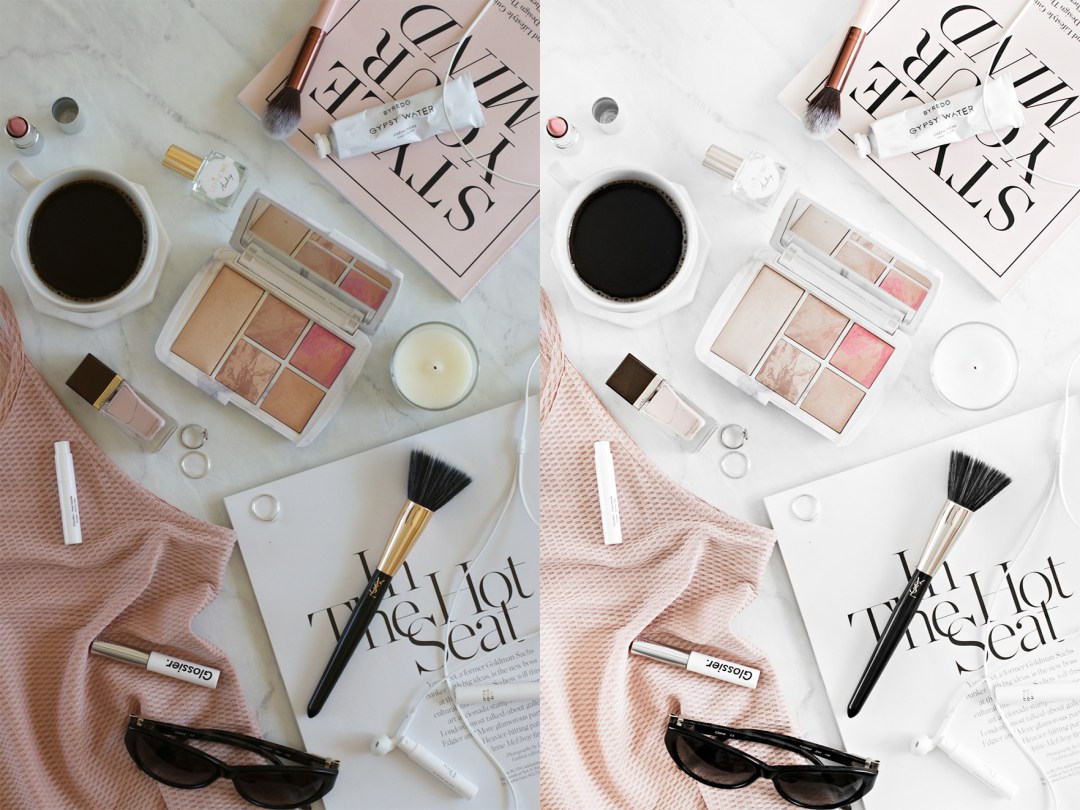
Before + after quick edit in Camera Raw
HOW TO FIX: A PHOTO THAT’S TOO YELLOW OR TOO BLUE

… or purple, or green. Before using Photoshop, this seriously was my biggest pain point when it came to blog photography. Sometimes even when I had no issues with adjusting my white balance in-camera, my photos still looked too yellow or too blue once I uploaded them to my computer. I’ve watched countless tutorials and it seemed like every single solution to this was way too time-consuming. I mean I love all things photography, but I am not willing to spend 2 hours fixing one photo that is poorly lit. Finally, I found a very simple and beginner-friendly way to do this in Camera Raw.

This SOOC image has a bit of a blue tone to it (which tends to happen a lot when working with marble backgrounds). To fix it in the simplest way possible, I’ll open the image in Camera Raw.

To adjust your tones all you have to do is open your raw file in Camera Raw, select the HSL/Greyscale tab, and adjust the intensity/saturation of your colors. So, instead of desaturating the entire image to get rid of those blue or yellow tones, you can desaturate only that particular color. Again, this is just one, simple way to do it, you can achieve the same thing with many other different tools.

Here’s the adjusted image edited in Camera Raw.
HOW TO FIX: A PARTIALLY DARK PHOTO
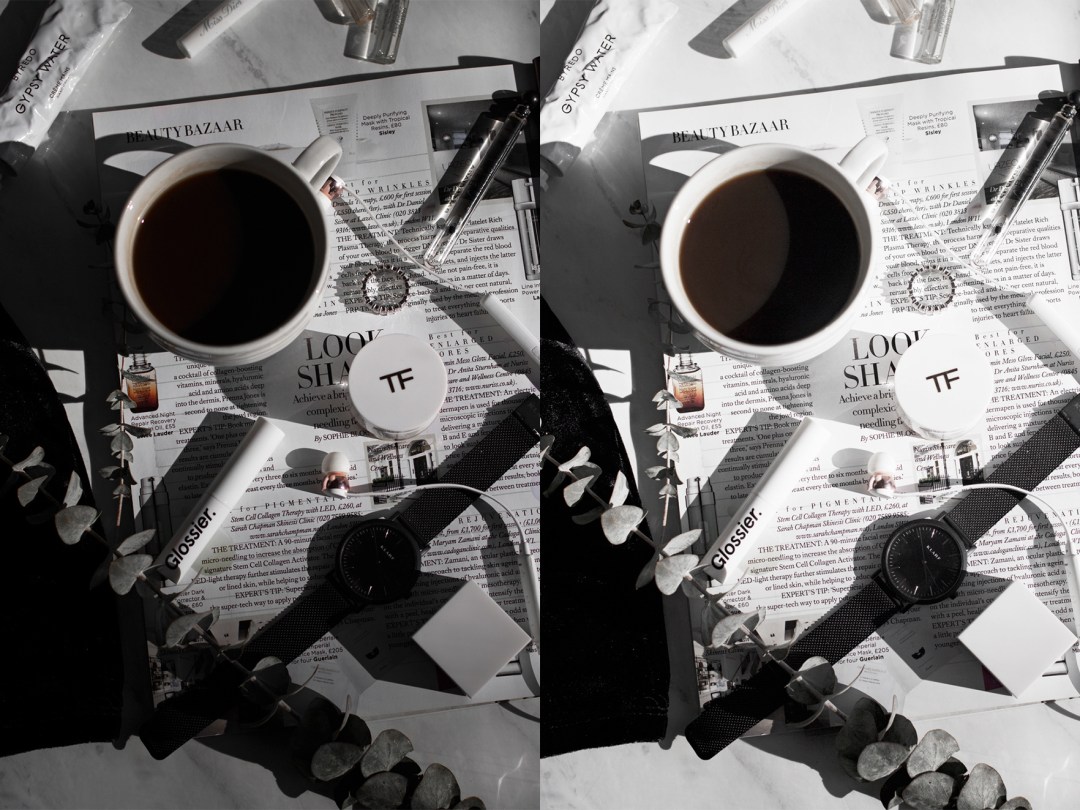
When it comes to shadows in your photos, it’s all about personal preference. A couple of years back I hated shadows in my images, now I love shooting images with dramatic shadows. With Photoshop, you can’t always remove the shadows completely, but you can easily reduce them. This is something that comes in handy especially when editing portraits or outfit photos. Dramatic shadows can look pretty in a flatlay, but they don’t always work great in portrait photography.
It’s worth keeping in mind that getting rid of shadows completely, can also make your image look unnatural. If you’re trying to remove shadows from a portrait or an outfit photo, the Shadows/Highlight option is a great tool to reach for. Open your image in Photoshop, duplicate your layer and go to Image >> Adjustments >> Shadows/Highlights. Check off the “Show More Options” box and from here, you can adjust the intensity of your shadows and tone, without affecting the highlights in your image. These settings will be adjusted differently for each image, so there aren’t any recommended values, you do have to be careful when adjusting the highlights as it might result in your image looking strange/artificial. Play around with these settings to see what works best for your image. You can also see this video from one of my favorite YouTube channels to see it in action.
When working with flatlay images, I love doing this using curves when trying to fix a bad photo. You can achieve this in curves by adding a curves adjustment layer, selecting the hand tool in curves and pinpointing a particular point on the curve you want to brighten.
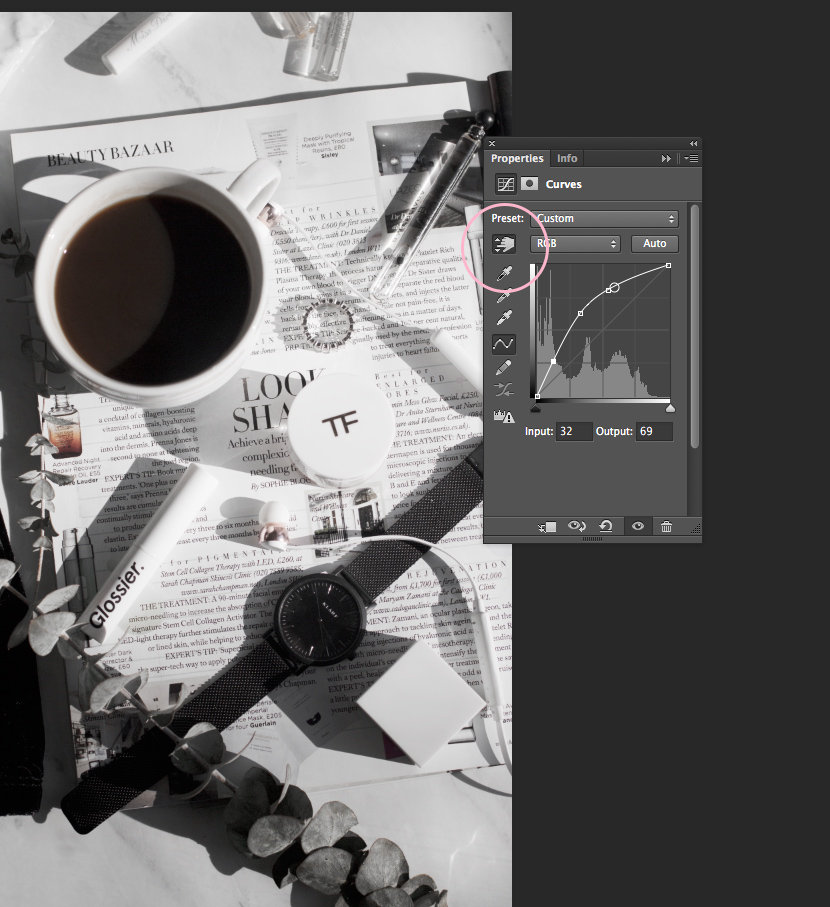
So, for the image above, I selected the hand tool in curves and pinpointed to the darkest shadow in the upper left corner of my image. Then, I adjusted the brightness of those shadows by dragging the hand tool up and down on the image itself. Again this all depends on the image you’re working with. Keep in mind that using this technique doesn’t brighten just that certain area of the image, but rather the particular point on the curve.
I know that for those of us who take our own blog photos, photography can not only a bit confusing at times, but it can be frustrating, too. Especially when you work with limited light and limited time. Shooting in RAW format allows to do as much non-destructive editing as you want, and you can always retrace your steps, make changes, without damaging the original image and losing its quality.
If you take your own blog photos, I highly recommend getting a Photoshop subscription. It might seem a little intimidating at first, but it’s something that can absolutely help you step up your photography game!


29 Comments
Bry Jaimea
April 3, 2018 at 11:37 amI do always love your photography – you’re so talented!
xx Bry Jaimea
Paula @ lifestylegleam.com
April 11, 2018 at 11:30 pmYou are too sweet, Love, thank you!
makeupgravity
April 3, 2018 at 12:33 pmGreat article!
Paula @ lifestylegleam.com
April 11, 2018 at 11:28 pmThank you!
Linda Libra Loca
April 4, 2018 at 8:01 amPhotoshop is still very complicated in my opinion, I do most of my work with Lightroom. I am determined to learn though, mainly so I acn make myself look like a 20 something supermodel!
Anne|Linda, Libra, Loca
Paula @ lifestylegleam.com
April 11, 2018 at 11:31 pmIt definitely does take some time getting used to- I find learning about it quite addictive. Haha, I don’t think you need that at all, you’re a natural beauty!!
Linda Libra Loca
April 12, 2018 at 7:36 amLearning about it is fun, but I haven't found a tutorial that really explains what I need, starting for absolute beginners.
Danielle Alexa
April 4, 2018 at 3:55 pmThis is such a great blog post with so many different tips and tricks!
Danielle xx
http://www.fashionbeautyblog.co.uk/
Paula @ lifestylegleam.com
April 11, 2018 at 11:31 pmYay, so happy you liked it, Danielle!
Erin Russell
April 4, 2018 at 6:04 pmAAAAH I love this post! If a photo is bad for me right now I just take it again so it’s good! Cause I SUCK at editing, so this post is fab! Thanks lovely!
Erin || MakeErinOver
Paula @ lifestylegleam.com
April 11, 2018 at 11:32 pmYou are very welcome, Erin!! So happy you liked this post!
Hannah Cao
April 5, 2018 at 4:25 pmThis is super helpful! Thanks for sharing.
Hannah | coffee with hannah
Paula @ lifestylegleam.com
April 11, 2018 at 11:32 pmYou’re very welcome, Hannah!
Joanna Joy
April 5, 2018 at 7:22 pmThanks for sharing all of your best photo editing tips. Your photos are some of the best I’ve seen! I feel that editing is always a work in progress, but enjoyable.
http://www.astylishlovestory.blogspot.com
Paula @ lifestylegleam.com
April 11, 2018 at 11:33 pmThank you so much, Joanna! I find editing very enjoyable, too. It’s just so relaxing to me, haha!
Perrine Vautour
April 9, 2018 at 9:50 amThank you for sharing all these tips! I really want to get started with Photoshop, but wanted to have a few tutorials handy before jumping in. These are exactly the things I want to use Photoshop for, so this post is perfect haha
Perrine
http://www.ola-banana.com
Paula @ lifestylegleam.com
April 11, 2018 at 11:38 pmYou are very welcome, Perrine! Photoshop was definitely a game-changer for me.
Izzati Zahari
April 10, 2018 at 9:07 amThis post deserves an award. THANK YOU SO MUCH. I always get so frustrated when my raw images look so bad. I didnt know simple fixes like these can solve my problems.
http://www.theoctobernoble.com
Paula @ lifestylegleam.com
April 11, 2018 at 11:39 pmNaww haha, thank you so much, my Love! Very glad you liked this post! x
Essex Hebridean
April 16, 2018 at 4:43 amCan I just say one thing here – deliberately shooting underexposed does not make the resulting dark photo “bad” – and it should also be pointed out perhaps that for the style of photographs you show here, NOT shooting underexposed would mean that you blew (lost) the highlights completely – and that would be a bad photo. most of the sort of editing you’re focusing on here is nothing to do with “fixing a bad photo” – it’s to do with processing that photo into your required finished shot – and is to a large extent exactly what would have been done in the darkroom in the days of film!
Clip and Touch
April 26, 2018 at 1:23 amI had been looking around for a tutorial on this exact technique. This is perfect.
Elliebowsandsparkles
April 26, 2018 at 2:07 pmA very interesting post Paula and so much to learn from it! I am so greatful I got to read it because I feel much more photography informed now! These photography posts are my guilty pleasure because it’s so satisfying developing my skills and seeing even the smallest improvement :D . The ability to take beautiful pictures to your own eye is a beautiful thing in its self!
Ellie Xx
http://elliebowsandsparkles.blogspot.co.uk/
Natalie Redman
May 27, 2018 at 11:04 amGreat photo! I think post editing after photos just goes to show that you can make most photos a lot better.
http://www.upyourvlog.com
Kamilla
October 10, 2018 at 9:29 amThanks so much! I learned so much!
http://www.artistakay.com
Brianna
September 3, 2019 at 10:17 amI absolutely love your photos, they’re always so crisp and clear! Would it possible to share some of your favorite camera angles? I am having trouble getting the right angles.
Erin
September 29, 2019 at 7:57 amReally it was amazing post. Thank you for sharing with us.
saher
October 14, 2019 at 5:50 amamazing article
rezuislam
April 2, 2020 at 1:10 pmVery much helpful tips for fixing a bad photo. Thanks for sharing this type of informative post.
Emily
December 14, 2021 at 9:04 amPhotoshop confused me.
Thank you for writing this informative post.